Today I would like to share with you four cards I made using Graphic 45 Botanical Tea paper collection. I love this collection--it's just beautiful. Lots of floral images and pretty springtime colors.
There are 24 different papers to choose from (12 front and back double-sided) so the possibilities are endless. It comes with 12 images that work very well on cards for the focal point, and I have chosen to use them in the cards I am showing you today.
 |
| The first card I made was this one featuring the large rose image. |
 |
| I used a doily to accentuate the rose. |
 |
I stamped two butterflies on vellum to flutter around the pretty rose!
The stamp and die is from Hero Arts |
 |
| I considered several stamps for my vellum stamping effect. |
 |
At this point I knew I wanted to use the vellum, but hadn't decided exactly what I would do.
Here I considered using the dogwood image, and had stamps out ready to go! |
 |
There are 24 different papers to choose from (12 front and back double-sided) so the possibilities are endless. It comes with 12 images that work very well on cards for the focal point.
|
 |
| Oops almost forgot these nice papers! |
 |
| I liked the way the dragonfly stamp looked on the vellum, especially using silver ink. |
 |
I played around with the butterfly vellum as an overlay
before I finally decided to cut out the butterflies. |
 |
| Wow, loving the way this looks. I'll figure out a way to use this for sure! |
 |
| Love the way the colors are seen through the vellum...very romantic! |
 |
I finally decided that I would cover the rose paper with a vellum sheet, and highlight the rose.
Layering the pattern papers, I selected the striped paper for behind the rose. I think it looks regal! |
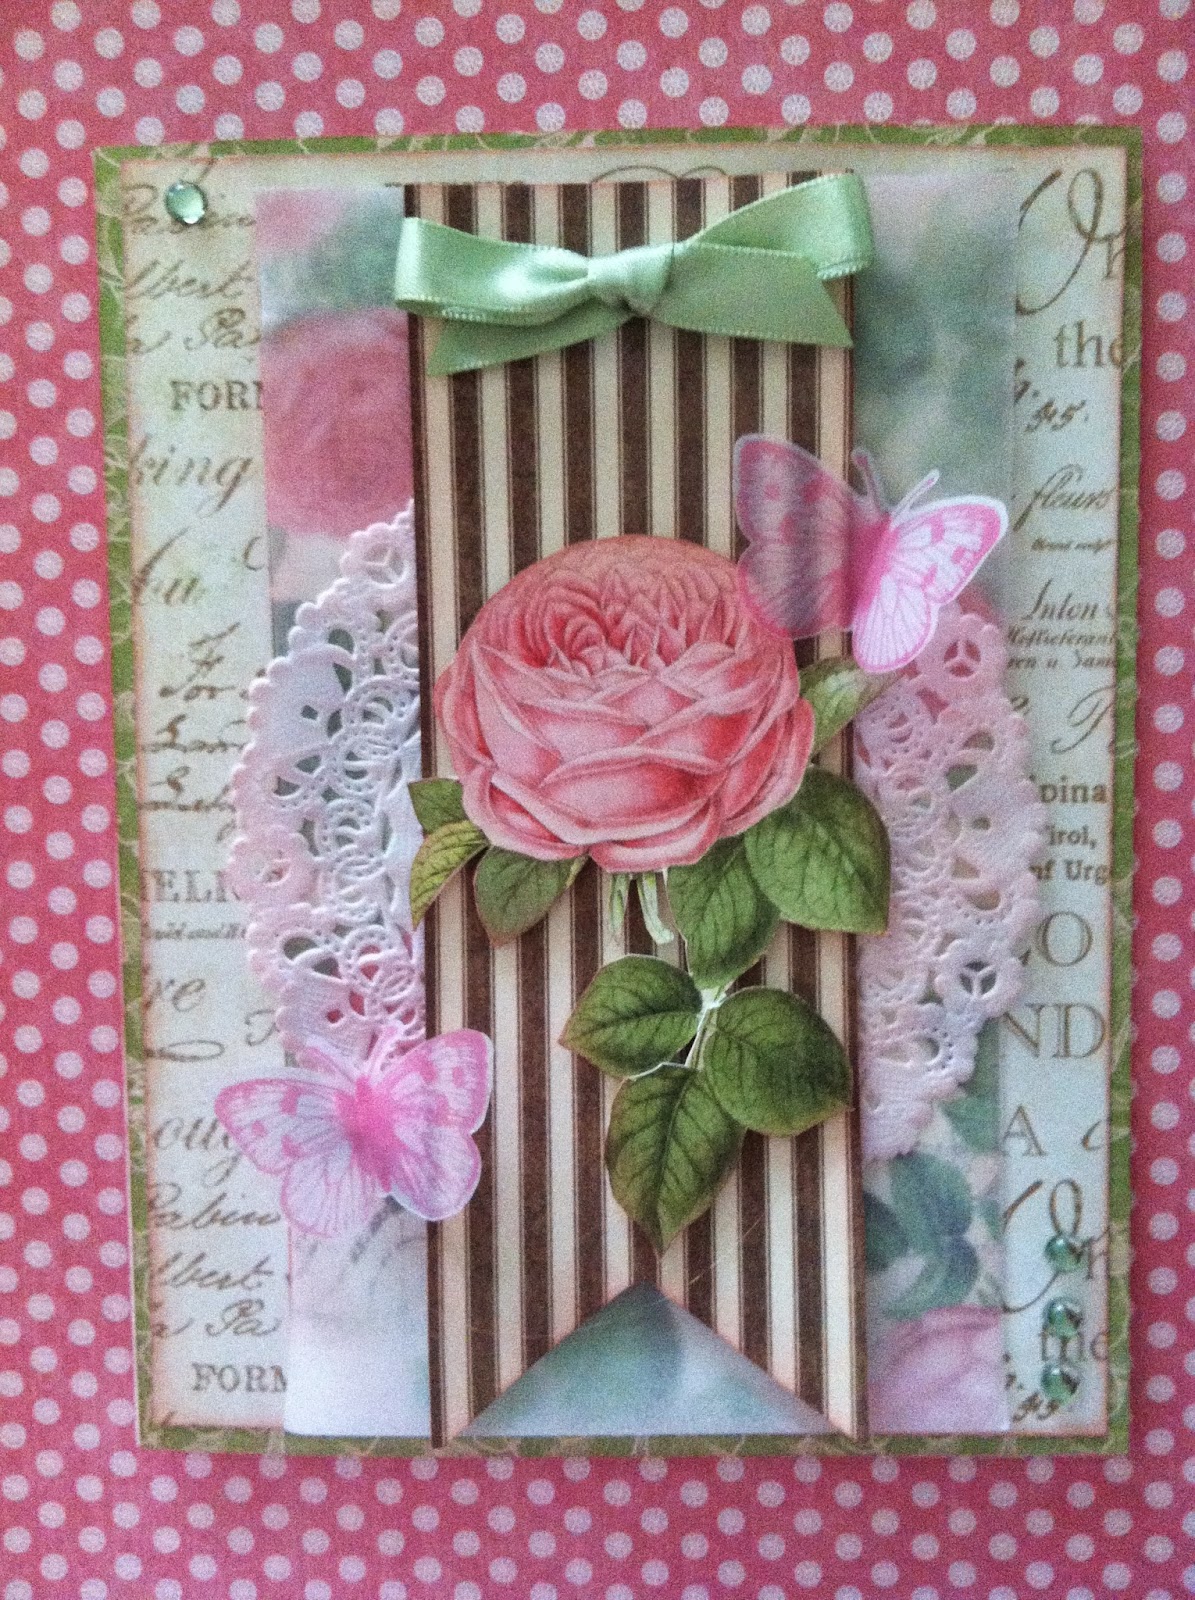 |
I fussy-cut out the rose image and centered it on the card.
Victorian Velvet distress ink was used on the edges of all the paper layers. |
 |
| Stunning! |
 |
| Came back to the dogwood image...I think I'll save this idea for another day... |
 |
I do this a lot when I design, putting papers on top of one another...
Its a way for me to imagine what the card will look like. |
 |
| I saw this image and thought to myself, SEED PACKET! |
 |
| Here is the finished seed packet card. I just love it! |
 |
I got out my seed packet stamp from the Garden Variety II set from Papertrey Ink.
There are several coordinating dies for this set, and the set is quite versatile! |
 |
| Using the patterned paper, I cut out the words for the sentiment. |
 |
| I stamped the seed packet with the word CARNATIONS. |
 |
It looks pretty but something didn't seem right...but what?
Can you guess? |
 |
| Yep! I forgot to stamp the seed packet. I had to re-stamp it. |
 |
Just messing around here. Wanted to see what a rose would look like in this seed packet!
I think it looks good! But not this card...maybe next time?
The re-stamped finished seed packet card is at the end of this post. |
 |
| This card was quick and easy. It just looks difficult but I promise it isn't. |
 |
I simply put patterned paper on the card face, and layered the floral image with a mat,
then popped up the image with dimensional tape. I cut a doily in half and tucked it underneath the paper.
Added a few droplets and a ribbon and it's finished! |
 |
Oh I have an extra butterfly! It might look nice on this card!
What do you think? |
 |
| This card was the highlight of the group! I wanted to keep with using the vellum theme, so I stamped the fern in green ink on the velum and placed it over the patterned paper. It softened it a bit. I used my Martha Stewart punch for the bottom lace effect, and also used real fabric lace on this card. The bird was fussy-cut out of the paper collection. |
 |
Once again I cut the sentiment from the patterned paper.
I also used a few roses from Wild Orchid Crafts. |
 |
The branch is a die cut from Memory Box, and worked perfectly for this card!
The Botanical Tea paper collection has endless possibilities for you so let your creative juices flow and give it a try!
If you would like to make the cards in this post, please leave me a comment with a way to contact you.
OR call Ink Paper Rubber in Overland Park KS,
so if you are local to the Kansas City area, please call them at 913-3981-2217 to enroll.
Kits may be purchased for those of you who cannot attend class or who are from out of town/state/country etc.
THE CARDS IN REVIEW
 |
 |
I hope you enjoyed this post, and liked the cards! Please post any questions or comments below. I love hearing from you all, and always will answer you back if you write me!
My next class at IPR will be a home decor project. A birdhouse!
Check back to see a sneak-peek next week!
Happy Creating!
ReNae
|


4 comments:
Wow, ReNae! You sure have been busy! These cards are gorgeous, and the details are beautiful. I've never worked with vellum but I love the effect it has on the cards here.
ReNae - Your cards are so lovely! You're right the images in the G45 papers are stunning. Love the way you stamped on vellum and let the colors show through - beautiful!
This is so absolutely stunning!!! You are such an artist! How would you mail a card like this?
For mailing, I usually wrap the card in bubble wrap. The envelopes are a good bit larger than the original card base, so usually they fit.
Occasionally I have to make an envelope using my Martha Stewart score board. But to be honest, most of my students never give them away, but rather use them as home decor pieces! They frame them or set them on an easel!
Post a Comment