Total Pageviews

Follow Me on Pinterest

Monday, April 22, 2013

Secret Garden Vintage-style Cards Tutorial

Hello Bloggers!
In my last post I showed you four beautiful cards made with Graphic 45's Secret Garden collection. Today I am showing you how to make them yourself with a pictorial tutorial!
If you have any questions please leave a comment below and I will be happy to answer your questions.

Supplies needed are as follows:
1. Spellbinders Nestabilities Dies:  
*Labels Four Dies (S4-190)  Use die #3.
*Decorative Elements "Fleur de Lis Rectangles Dies" (S4-317)  Use die #1
*Decorative Elements "Floral Ovals" (S4-356)  Use die #1
*Majestic Elements "Resplendent Rectangles" (S5-147)  Use Dies #2 and #3.

2. Graphic 45 12 x 12 paper in the following styles:
*Secret Garden-Two different  12 x 12 Lavender sheets, One 12 x 12 Floral sheet,
  One each Journaling sheet and Collage sheet.
* Place in Time-April page (front and back were used for Card #1-take care when cutting)

3. Adhesives
*Tombow mono multi
*Fabric tac (for fabric trims)
*Diamond Glaze or Glossy Accents
*tape runner
*pop dots

4. Embellishments
*Paper Roses
*small metal key
* blue and lavender ribbon 1/2 " wide - enough for two bows and a 6 1/2 inch trim.
*vintage-style victorian lace in white - 6 1/2 "
*cotton lace style trim in pink and white - 5"
*floral lavender trim 5 inches long
*German Scrap 1/2 " wide in gold 18"
*crystal gems in lavender and green - use as desired
*pearls in blue
*gold leaf pen
*blue. green, and salmon colored chalk ink for distressing edges and stamping sentiments
*lavender seam binding for ribbon

5. Cards and Envelopes
*Recollections brand 5 x 6.5 " pre-made cards with envelopes.  (available at Michael's)

CARD NUMBER ONE
"The Secret Garden"
From the Graphic 45 April "Place in Time" paper, cut the card base.
*The dimensions are 5 x 6.5 inches.  Make sure to cut the paper in such a way that you don't use the image for card #3, Turn over your paper and check to make sure you are cutting on the correct side!
You will be using the image of the ladies on another card! 


*Refer to the KEY at the end of this post for a MAP of the cards.  This will help you when cutting!
Adhere 5 " of cotton 2-tone lace to card base, then adhere card base to actual card.
It will look like this.
You should have cut 4 strips of German Scrap, one blue background from the back of the April sheet, the images of the children, and the image of the poem with the key hanging next to it. Using Labels 4 die, cut out the poem, distress the edges if desired, and set it aside.
Adhere the German Scrap to the back side of the cut out piece.
Using pop dots or other dimensional adhesive, adhere the cut out page to the page with the children.
You may have to trim to make it fit. You do have a bit of "play" when framing your image.
Your card should look like this.
Adhere the poem inside your card.  Remember to distress the edges or even use a gold leaf pen to add pizazz to your  the edges of the poem.
Tie a pretty blue bow, add pearls where desired and glue on the little key.
Your card is now finished!

CARD NUMBER TWO
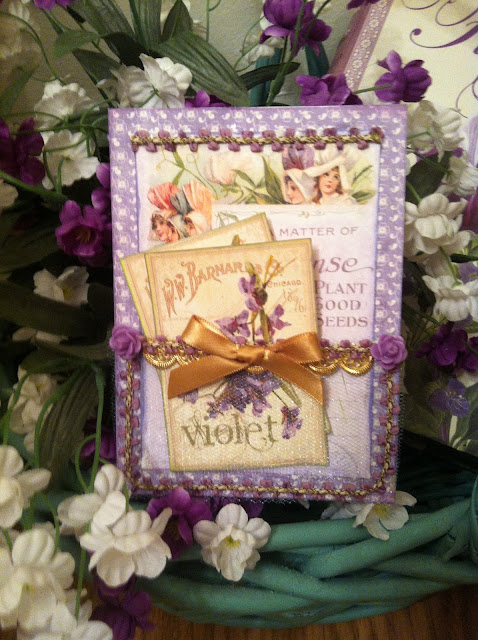
"The Seed Packet"

Before you start this card, cut out about 4 inches of lavender floral trim, and some blue tuelle, cut in a 6 x 4 inch rectangle.  Then cut 4 inches of German scrap, and place it on your craft sheet upside UP.  

The lay the tuelle on top of the scrap, then completing the sandwich lay the trim face up on top. 
Once you glue these parts together, set them aside and work on the other parts of the card.
Just make sure that the trim and the scrap line up evenly on the side.
Let the scrap peek out over the top of the trim.
Once dry, glue the tuelle to the back of the small card, creating a pocket in front.
Cut a frame using the Fleur de lis rectangle die, out of the floral paper. Place this journal page in front of the die cut so that the little circles show.  Then adhere the tuelle pocket to the paper.
It should look like this.
Adhere the lavender background to the card, dimensions are 5' x 6.5"
Cut two seed packets from the collage paper, and distress the edges if desired.
Embellish with lavender gemstones if desired, and add a pretty bow.
Stamp a sentiment inside if desired.  Your card is now finished!

CARD NUMBER THREE
A Pretty Spring Day"
Cut floral paper in a 5 x 6.5 inch rectangle, cut salmon paper in 2.5 x 6.5 inch strip.  Die cut a frame from gold foil paper, and draw an oval from the inside of the die, using Spellbinders "Floral Ovals" die.  Count out five flowers in like colors and a blue ribbon 6 1/2 inches long. 
Cut out the image of the ladies, and adhere to gold frame.  It will be a little bit smaller than the frame.
Adhere the salmon colored paper to the lavender paper.  
The salmon paper is on the back of the floral paper.
Cut your lace at 6.5 inches and adhere only the top to the card.
Then adhere the blue ribbon to the lace.
This student is busy working on this step!
This student works diligently on the Pretty Spring Day card.
This student sees to it that all of the little holes on her frame are properly punched out!
When finished your card will look like this!
CARD NUMBER FOUR
"Lavender Secrets"
This card uses two die cuts. the resplendent rectangles, dies 2 and 3.
Using the lavender paper cut out the card base.
Using the journal page, cut out the girl, and the other lavender paper serves as the background.
Use seam binding as a ribbon, and trim with the gold leaf pen.
Once you cut your die cuts, place them one on top of the other and adhere them using pop dots.
In class we substituted dimensional tape for pop dots.  
This student finishes her card with a bow made from seam binding.
Looks great!
Here is what the finished card should look like.
The students are all smiles as they work on their beautiful cards!
Here are some cards made in the smaller A2 size--Notice the small but subtle changes...


Add caption
I hope you enjoyed this tutorial and that you are inspired to get this paper line and make some beautiful cards for yourself and those whom you love.  Mother's Day is soon upon us, and one of these would be perfect for such an occasion!  
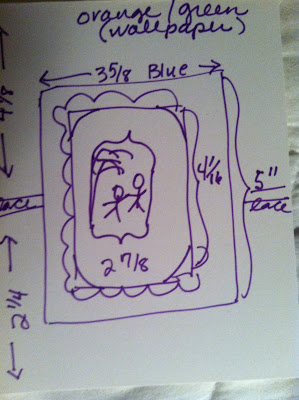
*Here are the maps I drew to help you figure out your cards and their measurements:


I will be posting a Mother's Day card done in my Vintage Style, so check back soon!

Until then, 
Happy Creating!
ReNae

Monday, April 15, 2013

Announcing "Dancing into Spring" Card Class and Tutorial

Hello Dear Bloggers!
I have Spring Fever!  Even though today is a rainy day,   it's clear that Spring will soon be here in all it's beautiful glory!  And to celebrate Spring's arrival, I have designed two cards sure to please that special friend on her birthday, or maybe your Mom on Mother's Day!
These cards are made with two Prima paper lines, Fairy Belle, and Divine.  I fussy cut paper, and used pearl and gemstone embellishments along with lace to make these magical cards.
You may enroll in a class to learn how to make these beauties at Ink Paper Rubber, in Overland Park, Kansas, OR, take my tutorial which will post here on the blog May 16th.
If there is enough interest, I may put together some card kits.
If you are interested in the class or a kit, please contact Jen at Ink Paper Rubber at (913)-381-2217.  Cost is $18.
I made two similar versions of each card to show you subtle differences you can make with just a few changes.  The captions below will illustrate what I did and how I did it.  Enjoy!

This is Fairy Belle, card #1, View A.  
Card #1 has white paper lace which has been fussy-cut from the same piece of paper as the image of the girl.  So only one piece of paper was needed for this card.  I also attached a butterfly to the image to give it a three dimensional effect.  Pearls and gemstones were added to the dress, to give her texture and richness.
I used a Jelly Roll holographic pen to highlight the Fairy wings and other points of interest.
The pink and blue flowers highlight the blue flowers of the paper.
The pink daisy trim frames the image and gives it a soft playful look!
Close up of Card #1 view A.
Card #1 View B.
The only difference here is that I used larger pearls on the dress, and clear bubble stones were used on the white lace, which reflected the pink color in the card.  I also used a different color scheme for the flower embellishments.  A purple rose was chosen to pick up the purple in the card.  
This is Divine Diva, Card #2 View A. 
Pearls and gems were adhered to the paper to highlight the image.
I fussy cut the bird and the foliage, and adhered with pop dots.
To show movement, gemstone swirls were adhered to the card under the bird cage and under her slipper.  Pearls, lace and a lavender ribbon completed the look. 
Close up.
Card #2 View B.
The birdcage was positioned at an angle to show even more movement.  The gemstones were put below both slippers and under the birdcage.  The lavender bow was omitted and instead I added corner embellishments.
If you would like to make some of these cards, contact Jen at Ink Paper Rubber at the number above.
And as always, leave a comment!  I love to hear from you and enjoy your comments!

HAPPY CREATING!
ReNae


Friday, April 12, 2013

New VINTAGE STYLE SPRING CARD class scheduled for April

Hello dear friends,
Just a quick post to show you my vintage-style cards for my April class!  There are four 5" x 7" cards made using die cuts on each card.  I used the new Graphic 45 paper line called The Secret Garden.
If you are interested in learning how to make these cards, you can do one of three things:

1. Enroll in the class at Ink Paper Rubber in Overland Park, KS.  Class will be held April 16th and April 17th.  Call Jen at Ink Paper Rubber, (913) 381-2217 and sign up. 
OR for class information, just click this LINK and you will be directed to their website.

2. Purchase a kit which includes everything you see here, pre-measured and ready to go!

3. Take my step-by-step tutorial which will post here on April 17, 2013.*
     *Taking the class or buying the kit are less expensive than going out and purchasing all the supplies, just fyi...

Here are the pretty vintage cards I designed for this class:

Card #1
Card #2
Card #3
Card #4
I hope you like these cards, and that you will enroll in the class today!  Kits are also available for this card set by calling Jen at Ink Paper Rubber at (913) 381-2217.  Four 5"x 7" cards and envelopes: $24.

Until next time,
Happy Creating!
ReNae

Thursday, April 11, 2013

ReNae is back with a Parisian Plaque!

Hello Bloggers!
Long time no see!  I am back today with a project to share with you.  Last time I posted I had mentioned my computer laptop was malfunctioning.  I think I finally have it fixed, so without further adieu, let's get caught up!

My Vintage Parisian Plaque was a class project I taught at Ink Paper Rubber in Overland Park, KS.
This project was really fun!  I was inspired by the Prima paper line called "Divine",  It has a pretty image of a girl dancing so I used that paper as a background on the tray, then filled in the sections with various keys, buttons, gems, dolls, and picture frames.  Each person in the class was encouraged to bring in personal ephemera to use on their tray.  All the products used here are available at Ink Paper Rubber in Downtown Overland Park, Kansas.  Their address is 7220 W. 80th St., Overland Park, KS.
Stop in and tell Jen or Manna you want to make a Parisian Plaque, and they'll be happy to assist you!

Here is a photo of my tray and how I designed it:
The Parisian Plaque
Here are the steps to make this tray:

Cut up the paper into rectangles and place in the corresponding section.
Add pearls, lace and metal embellishment to tray.
Embellish the girl with pearls as seen above.
I used vintage lace I received from my friend Lotta,  and added the word "Paris" to the metal above.
Close up of metal embellishment
Adhere flat-backed pearls to edges of plaque as seen above.
Close-up of pearl trim and lace.
I used fabric glue and Glossy Accents to adhere these.
Continue to add your favorite embellies...from keys to flowers to frames.
I used Vintaj Patinas to age the metal embellishments.
I die cut an Eiffel Tower and distressed it,
then added vintage buttons and Charlotte dolls, a cameo and bird's nest.
Close up of section

Prima Flowers and a Maya Road button
Prima Flowers and Prima Trinkets, aged with Vintaj Patina
Close up of the bird's nest section.  I used paper from the paper line, cut it out
and put it in the frame and covered it with Glossy Accents.
Tim Holtz "Frozen Charlotte" dolls
Vintage buttons and a Cameo
Prima trinkets and flowers
Tim Holtz bottles filled with pearls
So pretty
I attached a fleur-de-lis earring at the base to add to the Parisian theme.
I hope you enjoyed this post and that you try a plaque at home.  They are fun and easy, and can be given as gifts for brides, graduation or any special event.  Make it your own by using personal ephemera that means a lot to you or your special one.  Have fun, and Happy Creating!

Another project tomorrow!  I promise!
ReNae

Wednesday, February 13, 2013

Vintage Valentine "Same Style, Different Card"


Hi Bloggers!
I made a Vintage Valentine today, using basically the same techniques as before, with a few differences.  I want you to see how by just changing a few things, you can create a different yet equally beautiful card.  Making cards with this technique is easy and fun!  
I hope you like it!

I chose white trim, which I sprayed pink with Lindy's Stamp Gang sprays.
My supplies included pink trim, pink lace and Prima flowers.
Instead of decorating with white pearl trim on the outside of the card, I used pink pearls and adhered them to the edges of the focal image.  I put white lace on the edges of the image first, to cover the red edge and soften the look a bit.
I added Prima flowers and sprayed with Gimmer Mist, to give it a finished and polished sheen.
The card looks really pretty yet it is very different from the original I made for the class.
Here are some other cards I am trying to finish before Valentine's Day!
I had a question on my blog about German Scrap.  I will show you all some samples of German Scrap and the uses for it in my next post.
Happy Valentine's Day to you All!
lotsa love,
ReNae


Tuesday, February 12, 2013

Vintage Valentine Tutorial (Long Awaited!)

Hey Bloggers!
Here is the tutorial I promised you!  I am sorry but my laptop is still not working correctly so I finally was able to use my son's to do this post.  I tried doing it from my smart phone, but it is so hard to type on the phone, and so I just asked my son.  He lives in a neighboring town, so it was a few days before I got over there to get his computer!  Again my apologies!  Now, on with the tutorial!


First thing to do is collect your supplies. 
In an earlier post I gave you a list of items to gather which included Recollections 5 x 7 pre-made greeting cards in off-white. (They are available at Michael's Craft Store and come with envelopes.) You will also need patterned paper for the fronts of the cards.  I used Authentique "Beloved" and "Greetings", and the February paper from Graphic 45 "A Place in Time" and Kaisercraft Music themed paper "Aspen Frost" for the background of one of the cards.
Other supplies include Distress Ink in Vintage Photo, Versa Magic in Rosebud, Lindy's Stamp Gang sprays in various pinks and browns, blues and yellows. Glimmer Mist in Antique Gold, white pre-made Prima roses, (approx. 10 each card) Vintage Lace in Pumpkin and Off-white, Pearl trim, a blending tool or sponge, scissors, pop dots, tape runner or ATG, and fabric glue.  Other items include German scrap in Bronze, and one stick pin for each card.


For the pink "Authentique" card with the pearls (below) the directions are as follows:

1.  Ink all edges of card with Versa Magic in pink (Rosebud)
2. Cut out background paper from Authentique "Beloved" patterned paper measuring 4 5/8 x 6 1/8 inches.  Adhere to card front.
3. Cut vintage lace measuring 6 inches and adhere to center-front of card.
4. Cut out focal image from Authentique "Greetings" patterned paper. Adhere to center of card front over the top of the vintage lace.
5. Frame focal image with pink trim and adhere with fabric glue.  Note: If coloring white trim, spray trim with Lindy's spray prior to glueing.  Spray flowers with like colors so colors match.
6. Glue pearl trim to edges of card front.
7. Arrange and glue flowers to front of card and add stick pin as desired.
8. Stamp sentiment inside card.
9. Spray with Glimmer Mist to finish card.

For the brown "Graphic 45" card with the German Scrap (below) the directions are as follows:

1. Using blending tool, ink all edges of card with Distress ink in Vintage Photo. Ink inside card also.
2. Cut out a rectangle from Kaisercraft "Aspen Frost"  paper cutting at 4 5/8 x 4 3/8.  Cut another rectangle at 4 5/8 x 1 3/4 using striped paper from the back side of the February Graphic 45 paper, being careful not to cut images from the front that you will want to use later.  Adhere both of these to card front, then glue the pumpkin lace right along the seam of the two papers.  Let dry.
3. Cut focal image from front of February Graphic 45 paper.  Do NOT adhere to front of card before doing the next step!
4. Using an 18 inch piece of German Scrap, frame edges of focal image and set aside to dry.
5. Stamp sentiment inside card with Vintage photo distress ink.
6. Adhere focal image to front center of card with pop-dots.
7. Color flowers with Lindy's sprays if desired and adhere to the sides of the framed focal image.
8. Spray with Glimmer mist to finish card.

I hope you enjoy making these cards!  They are easy to make if you prepare and gather your supplies before you begin.  I taught 2 classes and everyone's cards turned out great! (see previous post)
HAPPY VALENTINE'S DAY and Happy Creating!


ReNae